
Tuesday, November 8, 2011
0 Recipe #299: Multigrain Hot Cereal with Fresh Fruit & Nuts


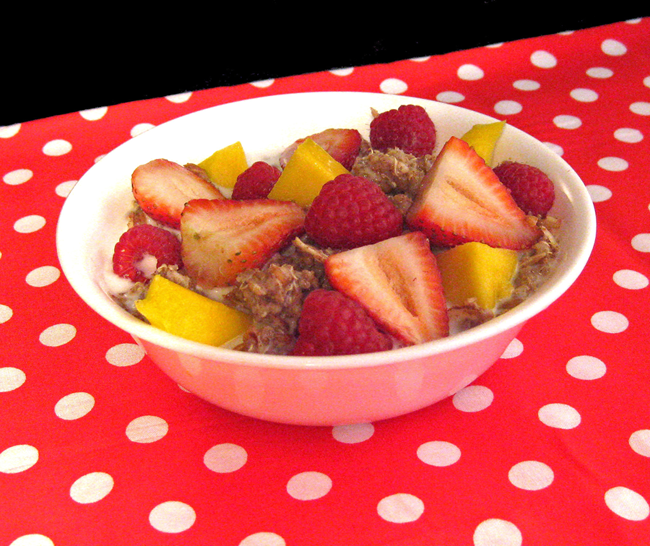 |
| Multigrain hot cereal with mangoes, strawberries, red raspberries, and toasted walnuts and almonds. |
This recipe is a favorite! So I hope you will like it. Like many of the previously featured dishes from the past few months, this one's also part of the ongoing "Resourceful Recipes" series. In case you need a refresher or are just tuning in, the Resourceful Recipes" series is intended to provide solutions for those who want to cook healthy and economical meals for their families. Related posts will demonstrate how to make the most of humble foods or provide creative ways to use up leftover ingredients.

In this particular instance, the whole grains featured in this recipe are not only highly nutritious, but also happen to be fairly basic, inexpensive staples with a long shelf-life. And best of all, you'll be able to easily find most of the ingredients in your local supermarket. The only things that could possibly be challenging to find are the millet and wheatberries, although at this point in supermarket evolution, the former will probably be more readily found than the latter. However, if you can't find millet for some reason, you can try either a health store or an international supermarket. (I found millet at the latter, in the Indian section of my local international supermarket.) Or, you can always buy millet online. That's where I got the wheatberries. More specifically, I've found that Barry Farms sells great products (via Amazon.com), so I've stuck with them for the wheatberries and other types of specialty grains, etc.
Speaking of which, I'm happy to announce that my Amazon Store now contains almost all of the specialty ingredients used in my recipes. :) Of course, I've done this to make it really convenient and easy for you, as it's sometimes a real challenge to find some of these ingredients locally. Also, the searching and buying processes take a lot less time when they're done online. :)
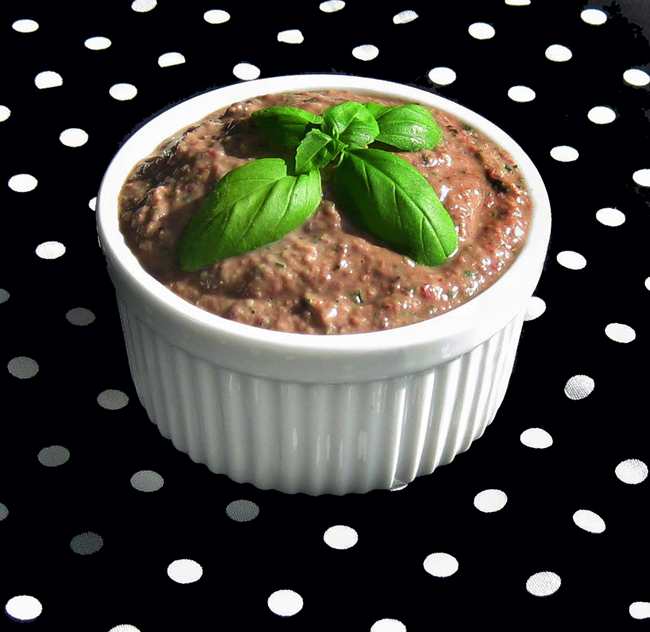
 |
| Just one example of an item that I've bought and loved, and then added to my Amazon store. :) |
Not only will you be able to find direct links to these resources within apropos recipe posts that call for these ingredients, but I've also embedded my store into this site as an inline frame so that you'll be able to shop at Amazon.com directly from my website without even having to leave the page. (Please note that all transactions are secure/encypted and handled directly via Amazon.com.) So, this way, if you need to find an online resource for a particular recipe on my blog, you won't have to look very far.
 So, anyhow, let's get back to talking about this recipe and its nutritional value: As you may know, wheatberries are not only to used to make bread; they can also be cooked and consumed whole. Of course, they are much healthier this way as the whole form preserves the bran, germ, and endosperm of the wheat, i.e., the most nutrient-rich parts of the grain. :) So basically, it's the entire whole wheat kernel minus the hull. :) Contrast this to processed wheat products, in which these components are removed, stripping roughly 40% of the original nutritional value from the grain.
So what does a wheatberry taste like? Well, in my opinion, they taste great! :) They have a slightly nutty flavor and are slightly chewy when cooked. Thus far, this blog only has one other wheatberry recipe, a pilaf dish, but I plan to make more recipes using this very versatile grain. So, this way, you'll have more opportunities to try out a wider array of wheatberry dishes and also use up that bag of wheatberries you just bought from my Amazon Store. :) Lol.
Here are some brief tidbits about the other grains found in this recipe:
--Most of the nutrients in bulghur are kept intact as only a very small amount of the bran is removed.
--Technically, quinoa isn't really a grain; it's considered to be a fruit, believe it or not. Also, millet isn't a grain either; it's a seed. At any rate, however they're categorized, they're both yummy! :)
--Did you know that quick cooking and instant oats are the actually the same thing as rolled oats, except that they've been rolled even thinner and cut into small pieces? (Of course, this is why they cook more quickly.)
One final comment: This dish takes a while to cook (i.e., about 56-58 minutes total prep time), so it's probably best to save this recipe for a relaxed weekend morning or a day off. What I like to do is make enough for the next few days, then transfer it to a sealed contained and put it in the fridge. It keeps pretty well, so if you make it on a Saturday or Sunday, then you'll have some left over to enjoy for the first few days into the week. In cooking, as in life, advanced preparation makes all the difference. :)
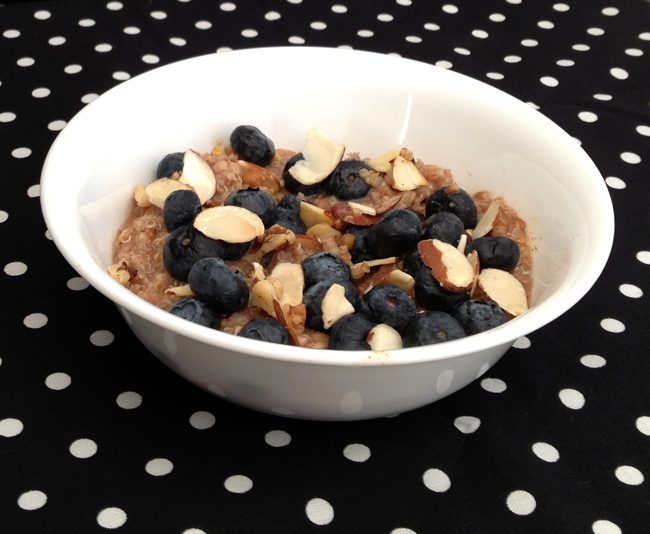 |
| Fresh blueberries and a generous sprinkling of toasted walnuts and almonds are the perfect complement to this hot multi-grain cereal. |

Ingredients:
6 c. water
1/4 c. wheatberries*
1/4 c. millet
1/4 c. quinoa + 1/2 c. water (for soaking)
1/4 c. (regular, rolled) oats**
1/4 c. bulghur
1 tsp. pure vanilla extract
2 Tbsp. ground cinnamon
1/8 tsp. salt
3/4 c. non-GMO soy or coconut milk (or skim milk, if you prefer)
Toppings:
2 Tbsp. honey, to taste
1/4 c. slivered almonds
1/4 c. walnuts, halved or crushed
1 c. seasonal fruit mixture (red raspberries, blueberries, mangoes, peaches, strawberries, bananas, etc.)***
Directions: Bring covered pot of water to a rolling boil, about 6-8 minutes. While you're waiting for the water to boil, soak quinoa for 5-10 minutes until it starts to puff up a bit. (This is a very important step as quinoa needs to be soaked in order to release its saponin, which creates a bitter taste unless removed.) When quinoa is ready, transfer into a fine mesh sieve, rinse under running water, and then drain and set aside.
When water has reached a rolling boil, remove lid, add wheatberries, and then cover again with lid and boil on high heat for 15 minutes, or until slightly tender. Then remove lid, add millet, stir once or twice, cover again, and boil for another 20 minutes. Reduce heat to low, then add rinsed and drained quinoa, stir, cover once more, and simmer for an additional 5 minutes. Water should be almost absorbed by this point. If necessary, add a little bit more water to keep the bottom of the pot from scalding. Uncover, add oats, bulghur, and vanilla extract, stir, cover again with lid, and cook for a final 5 minutes.
While the hot cereal is in its last 5 minutes of cooking, place nuts onto an aluminum-foil covered toaster pan and toast on 350°F for 2-3 minutes, or until light golden brown. Watch nuts carefully, as they will burn very easily. When finished, set tray aside to allow nuts to cool for 5-10 minutes.
When cereal is ready, uncover, and then stir in honey, cinnamon, and salt. (Or, alternatively, let each person add their own amounts to taste, according to personal preference.) Fluff, then let stand 5 minutes to cool slightly. Pour in milk and stir in fruit and nuts. Place into bowls, serve, and enjoy.
Yield: 4-6 servings.
Chef's Notes: *Wheatberries: I recommend using the hard red spring variety, since it's got the highest protein content out of all the different varieties. Wheatberries take a while to cook, but if you cook them with the lid on, they'll cook a lot faster. :) Please note that if you don't cook them long enough, they're going to be a bit tough and overly chewy. So, in other words, do something else in the kitchen while they cook, so you'll still be near enough to watch the pot but at the same time won't be tempted to pull them off the stove a bit early. ;) This is definitely one instance in which patience pays off. :) Remember that, after the wheatberries, you'll be adding the next set of ingredients in another 20 minutes, so best to set the timer for 15-minute intervals and check on the water level a bit early, just to be on the safe side.
**Oats: Nutritionally speaking, steel cut oats are a better source of fiber and nutrients than rolled oats, as they contain the whole oat kernel, (whereas most of the bran is removed for the latter). Although steel cut oats are less processed than rolled oats, they take longer to cook. I didn't happen to have steel cut oats on hand when I was creating this recipe, so I just used regular, "old-fashioned" Quaker oats, as they called. However, if you'd like to use steel cut oats instead of rolled oats for this recipe, then I suggest you add them at the same time you add the millet, since they take at least 20 minutes to cook.
***Alternative toppings: If you've got a limited selection of available seasonal fresh fruit, another great idea is to add raisins &/or other types of dried fruit (dried cherries, cranberries, etc.) to your hot cereal, which can either be incorporated separately or mixed together with whatever fresh fruit you have on hand. Or, another creative idea is to add fresh coconut slivers or unsweetened shredded coconut, either in addition to or as a replacement for, the almonds and walnuts.
0
blogalicious comments


Links to this post
Saturday, November 5, 2011
2 Recipe #298: Miso-Glazed Chicken with Baby Bok Choy & Chinese Broccoli Stir-Fry

Here's another quick, easy, and delicious side dish, which I made for dinner yesterday. Guess you could say that this one could be classified as recipe number three of the "Resourceful Recipes series, as the ingredients themselves are fairly inexpensive. If you're looking for save a few dollars on specialty items like mirin and Chinese broccoli, I'd recommend buying your vegetables at an Asian grocery store. A lot of times, these items will cost far less than buying them at a generic grocery store. They will also typically be more authentic and, depending upon where you buy, often higher quality too. :)
Miso-Glazed Chicken with Baby Bok Choy & Chinese Broccoli Stir-Fry
Chicken Entrée Ingredients:
1 lb. (8 oz.) thinly sliced (about 1/4"-thick), skinless, boneless chicken breasts, rinsed, defatted, tendons removed, patted dry, and then cut on the bias (i.e., diagonally and against the grain) into 1 1/2"-wide strips*
1 Tbsp. sesame oil
Glaze Ingredients:
2 Tbsp. garlic, peeled and finely minced (about 4 large cloves)
1 1/2 Tbsp. ginger, peeled and finely minced (about 1 1/2" piece)
1/2 tsp. salt
1 Tbsp. mirin
1 Tbsp. low-sodium soy sauce
1/4 tsp. crushed red chili pepper flakes, or to taste (depending upon heat preference)
2 tsp. honey
1 Tbsp. sesame seeds
2 Tbsp. MSG-free white miso paste
2 Tbsp. lukewarm water
Vegetable Stir-Fry Ingredients:
1 Tbsp. sesame seed oil
1 Tbsp. garlic, peeled and finely minced (about 2 large cloves)
1 Tbsp. ginger, peeled and finely minced (about 1" piece)
1/3 c. shallots, peeled and minced (about 1 extra-large shallot)
2 Tbsp. mirin
1 Tbsp. low-sodium soy sauce
1/4 tsp. wasabi paste (optional)
1 c. Chinese broccoli, sliced crosswise into 1 1/2" pieces
2 c. bok choy, sliced crosswise into 1 1/2" pieces
1/4 c. scallions, sliced crosswise into 1/4" rounds (about 4 large scallions)
Directions: Prepare the chicken: First, place rinsed, cut chicken into a large, resealable plastic/Ziploc bag, allowing it to reach room temperature as you prepare the other ingredients, and then set it aside.
Next, make the garlic paste, using a large mortar and pestle: Place 2 Tbsp. garlic, 1 1/2 Tbsp. ginger, and 1/2 tsp. salt into the mortar and pulverize with the pestle until the mixture forms a smooth paste. (Or, you can use a food processor, if you prefer. I find it very satisfying to vigorously smash ingredients together by hand, but again, it's up to you. :-D )
Make the glaze: Add 1 Tbsp. mirin, 1 Tbsp. low-sodium soy sauce, 1/4 tsp. crushed red chili pepper flakes, 2 tsp. honey, and 1 Tbsp. sesame seeds to the garlic paste mixture, and set aside. In a separate bowl, place 2 Tbsp. white miso paste into a small custard dish, followed by 2 Tbsp. lukewarm water. Allow miso to dissolve for 2-3 minutes, then stir until well-combined. Transfer miso paste mixture to mortar, thoroughly combine, and then pour entire mixture into the plastic/Ziploc bag containing the chicken. Allow to marinate for at least a 1/2 hour, or ideally, overnight.
Cook the chicken: In a large (12-13"), nonstick sauté pan, heat 1 Tbsp. sesame seed oil on high heat until glistening, about 1-2 minutes. Then reduce heat to low, add chicken and sauté for about 5-7 minutes per side, or until golden brown. If necessary, cook in batches, so that chicken has enough room to cook evenly. (Tip: If chicken still hasn't browned enough to your liking, you can also speed up the process by putting it on the grill or in a 375°F preheated oven and crisping it for another 2-3 minutes.) Divide into 4 even portions, place onto plates, and set aside.
Make vegetable stir-fry: Mix together 1 Tbsp. garlic, 1 Tbsp. ginger, 1/3 c. shallots, 2 Tbsp. mirin, 1 Tbsp. low-sodium soy sauce, and 1/4 tsp. wasabi paste, (if using), in a small bowl, and set aside. (You can reuse either the mortar or the custard dish you used earlier to minimize dishwashing.) Then, in the same pan you just used to cook the chicken, heat 1 Tbsp. sesame seed oil on high heat until glistening, about 1 minute. (Oil will heat faster due to residual heat.) Then reduce heat to low. Add ginger-garlic-shallot mixture to the pan and cook for 1-2 minutes, stirring occasionally. Then add Chinese broccoli and bok choy, cover with lid, and sauté for about 5 minutes, or until tender and liquid has (mostly) evaporated. Watch vegetables carefully, as they'll cook more quickly than you might expect, especially now that the pan has retained heat from previous use. Remove from heat, mix in scallions, and then transfer to plates, diving the stir-fry into 4 equal portions. Serve immediately.
Yield: 4 servings.
Chef's Notes: Whatever you do, please do not substitute commercial ginger-garlic paste from a jar or tube. The ratio of salt to ginger and garlic in this recipe is very important, and if you use a pre-packaged, manufactured product, these ratios can vary drastically, thereby completely altering the flavor of the dish. This way, you can ensure consistency and the flavor balance (i.e., particularly the saltiness and strength) will be just right.
*If you are unable to find thinly sliced chicken fillets in the supermarket, just buy regular, skinless, boneless chicken breasts and tenderize them: Place chicken onto a large, clean, non-porous cutting board and cut into 2" wide strips. Cover with plastic wrap and pound with the bumpy, textured end of a meat mallet until flattened to a 1/4" thickness.
For a vegan or vegetarian adaptation of this dish, substitute tofu for the chicken.
2
blogalicious comments
Links to this post
Friday, November 4, 2011
0 Recipe #297: Greco-Roman Pasta Salad

Here's an easy and inexpensive dish, the second recipe from the ongoing "Resourceful Recipes" series, which incorporates some of the same ingredients from the previous recipe post, to ensure that none of the leftover ingredients from this recipe will go to waste. :)
The most expensive thing on the ingredient list is probably the nonfat feta cheese, and at that, it's only a few bucks and can be used for multiple recipes.
The only thing that needs to be cooked in this recipe is the pasta; the water takes only 8 minutes to boil, and the pasta another 8 minutes after that. So between these two activities, you should have more than enough time to chop up the ingredients while you're waiting for the pasta to finish.
Nothing like a dish that's easy, healthy, fresh, and cost-effective to boot. What's not to like? :) Making and eating healthy meals doesn't have to be a major production. These are the types of meals that are perfect to make during the week, when there's less time and you're not exactly up for cooking an 8-course meal. ;)
After all of the energy you'll have after making and eating this easy and nutritious dish, maybe you'll be in the mood to wrestle afterwards. ;)
Greco-Roman Pasta Salad
Ingredients:
4-6 c. lightly salted water, seasoned with a drop of extra virgin olive oil (for boiling pasta)
1/2 c. dry (uncooked) enriched multi-grain rotini pasta (or other pasta shape)*
2 small anchovy fillets (from a tin, packed in oil) (about 2 tsp.), drained and rinsed (or use 2 tsp. anchovy paste)**
3 Tbsp. freshly squeezed lemon juice
1 Tbsp. extra virgin olive oil
2 tsp. garlic, peeled and finely minced
1/2 c. red onion, peeled and finely diced
1/3 c. scallions, sliced crosswise into 1/4" thick rounds
1/2 c. nonfat plain feta cheese, diced into 1/2" cubes**
1 1/2 c. grape tomatoes, halved crosswise
1/2 c. brined Kalamata olives, drained, pitted, and halved crosswise
1/3 c. brined Sicilian green cracked olives, drained, pitted, and halved crosswise
1/4 c. fresh Italian flat-leaf parsley, roughly chopped and densely packed
1/4 c. fresh basil, minced, julienned and densely packed
1 Tbsp. fresh marjoram leaves, densely packed
1 Tbsp. fresh thyme leaves, densely packed
1/8 tsp. ground black pepper
Directions: Bring water to a rolling boil, about 8 minutes. Meanwhile, do your kitchen prep: Squeeze lemon juice and place into a small custard dish; chop up all produce (i.e., garlic, onions, scallions, tomatoes, olives, herbs, etc.) and feta, and place into a large bowl. Using a fork, mash anchovies in a separate, medium-sized bowl. (Or, if it's easier, you can also melt them for a minute or two in a small nonstick pan, and then transfer them back into the bowl.) Cover anchovies with lemon juice, and let stand for 5 minutes. Then add olive oil, garlic, and red onions, and stir until solid ingredients are completely covered in lemon juice and olive oil. Let stand another 5 minutes. (Lemon juice will "cold cook" these ingredients and also remove their pungency.) When water has reached a rolling boil, add pasta and cook until al dente, according to package instructions. (Barilla Plus rotini takes about 8 minutes to cook.) While pasta is cooking, transfer ingredients soaking in lemon juice and olive oil to the large bowl containing the other salad ingredients, and gently toss. Do not drain liquids! (It's important that the lemon juice & olive oil be added to the salad as well, as they will be used to flavor the dish.) When ready, drain pasta into a colander and let cool for 5-10 minutes. Transfer cooled pasta to large bowl containing all other ingredients, season with black pepper, and toss once more until just combined. Ideally, it's best to chill the salad in the refrigerator (in a covered container) for at least 30 minutes before serving, so that the flavors have an opportunity to meld. Serve chilled or at room temperature, and enjoy!
Yield: 2-3 servings as a main course, or 3-4 as a side dish.
Chef's Notes: Optional ingredients: This salad would also taste good with fresh, sliced mushrooms, &/or cucumbers. Or, raw zucchini, in place of the cucumbers, would also work as well.
*I recommend using Barilla Plus pasta, which is a type of multigrain pasta enriched with protein, fiber, and ALA Omega-3's. Please note that I'm not being paid to say this. :) I just really like this kind of pasta; plus, it's got obvious nutritional advantages over regular plain pasta. This is one of the few multigrain pastas I've tried that doesn't actually taste like it's multigrain, if you get my gist. ;)
**To make this recipe vegetarian, just omit the anchovies, but still follow the directions for "cold cooking" the other ingredients in the lemon juice and olive oil mixture. To make this recipe vegan, simply omit the feta cheese or substitute a non-dairy cheese substitute like soy cheese, etc.
0
blogalicious comments
Links to this post
Wednesday, November 2, 2011
1 Recipe #296: Italian-Style Olive & Pinto Bean Dip
As promised, here's the first dish in the "Resourceful Recipes" series I'd introduced just a few days ago. As you can probably tell from the below recipe, I'm out to prove that eating on a budget doesn't have to be plain or boring. So get ready to kick your inner curmudgeon to the curb. :)
True to form, the ingredients in this recipe are inexpensive and yet, still packed with nutritional value. In fact, this dish can be made for only a few dollars: For example, the can of pinto beans Erik brought home from the grocery store cost only 89¢. The 2 oz. can of anchovies cost $1.99, but only 2 anchovy fillets are called for in this particular recipe. The fresh herbs are about $1-2 each, depending on the size of the package you buy. (Or, if you are already growing them indoors, they are free. :-D) Plus, a lot of the ingredients can be used for multiple recipes, so their cost, per recipe, is actually even less than it might seem at first glance. You can really get a lot of mileage out of these ingredients. So, as you buy them, you can plan to make other recipes which call for those very same ingredients, so that nothing goes to waste. This way, any opened cans &/or fresh produce can be used while they're still good.
So, in order to help you make use of any leftover ingredients you might have after making the below recipe, I'll be posting some more recipes using fresh herbs, anchovies, and some of the other, below-listed ingredients. :)
The nice thing about this dish is that there's no cooking required. So aside from a small amount of kitchen prep (i.e., minimal chopping, soaking two ingredients, etc.), all you have to do is just toss everything into a food processor, pulse it for a few seconds, and you're done. Can't get much easier than that, eh?
Italian-Style Olive & Pinto Bean Dip
Ingredients:
15.5 oz. can pinto beans, rinsed and drained
2 small anchovy fillets (from a tin, packed in oil) (about 2 tsp.), drained and rinsed (or use 2 tsp. anchovy paste)*
1/8 c. (2 Tbsp.) freshly squeezed lemon juice (for soaking anchovies), plus more to taste
1/4 c. whole green or black, brine-cured (i.e., Kalamata or Greek) olives, pitted and halved (about 8-10 medium-sized olives)
1/4 c. red onion, diced
1/2 Tbsp. garlic, peeled and finely minced (about 1 large clove)
1/4 c. red onion, diced
1/2 Tbsp. garlic, peeled and finely minced (about 1 large clove)
1/2 Tbsp. capers, soaked in 2 Tbsp. water for 10 minutes, then drained, and squeezed dry
1/2 tsp. Dijon mustard
1 Tbsp. extra virgin olive oil
1/8 c. (2 Tbsp.) fresh Italian flat-leaf parsley, roughly chopped and densely packed
1/8 c. (2 Tbsp.) fresh basil, minced, roughly chopped and densely packed
1/2 Tbsp. fresh marjoram leaves, densely packed
1/2 Tbsp. fresh thyme leaves, densely packed
1/8 tsp. ground black pepper
Directions: In a small bowl, soak anchovies in 2 Tbsp. lemon juice for 10-15 minutes. Do not drain. Place the bowl of anchovies and lemon juice into a food processor, followed by the remaining ingredients, and pulse until just combined. Then taste and add more lemon juice if necessary, to suit your personal preferences. Transfer the mixture to a container, seal, and chill in the fridge for at least 30 minutes before serving. (Don't be too concerned about the olive oil congealing in the fridge, as it'll melt again once the dish is taken out and allowed to reach room temperature.) An hour before serving time, remove from refrigerator to let it reach room temperature. Serve with crostini. If desired, garnish with a handful of fresh basil leaves, torn into small pieces, &/or a few lightly toasted pignoli (i.e., pine) nuts. Refrigerate any leftovers in a sealed container. (Mixture will keep for about a week.)
Yield: Makes a little over 3 c.
Chef's Notes: Selecting and preparing canned anchovies: Choose high-quality, salt-cured ones that have been packed in olive oil, preferably the Sicilian kind, if available. Please note that, in this particular recipe, the anchovies are soaked in lemon juice, a known seafood "cleanser," in order to reduce their "fishiness." The acid in the lemon juice will "cold cook" the fish and kill off any remaining volatile amines.
With the olives, capers, anchovies, and Dijon mustard, this dip clearly doesn't require any additional salt. In fact, since it's so salty, this is why it's usually served with bread and other mild accompaniments. ;) It's rather intense by itself, and so, it needs something else to buffer/offset its concentrated flavor.
*To make this recipe vegetarian or vegan, simply omit the anchovies. Be sure to add the lemon juice, even though you won't be soaking any anchovies in it.
Serving Suggestions: If you're looking for an easy but elegant appetizer to serve for an hors d'œuvres platter -- whether for cocktail hour, a dinner party, or other festive occasion -- this recipe will certainly fit the bill. For an elegant presentation, serve on crackers or toasted mini baguette rounds, spreading each cracker/round first with soft goat cheese (chèvre), followed by a dollop of dip, and top with a small sliver of roasted red pepper. Or, if you'd rather skip the bread products, serve on slices of tomatoes, cucumbers, or grilled eggplant or zucchini.
Alternatively, you can eat this dish for a light meal or as a mid-day snack. Serve on ciabatta, either open-faced or as a sandwich. For the latter, add lettuce, cucumbers, tomatoes, alfalfa sprouts, etc., or whatever else strikes your fancy.
1 blogalicious comments
Links to this post