
Saturday, July 31, 2010
0 A Little Bit of This, A Little Bit of That.....


Whether people realize it or not, the recipes on this blog are very carefully selected for their potential appeal or potential culinary challenges. :)
Admittedly, not all of the recipes here are for everybody. Some might even very well give people pause before they dip their toe in & convince themselves to take a risk, step into the unknown, & try something totally beyond their parameters. That is intentional. :)
After all, what is life without a little adventure? Yes, sometimes the point of this blog is to take people out of their culinary comfort zones.
.jpg)
So, to hedge my bets (& not waste food!), I decided to only make a little bit of it in my test kitchen. And you know what? It was surprisingly good. I didn't expect that. Had I chosen not to try it, I'd never have discovered this. I'd never have known. In fact, I would probably still be wondering right now whether or not I would like it. :) Instead of being a big chicken (Bock bock!) & playing it safe, I decided to take the opportunity to go for it, satisfy my curiosity, & expand my horizons.

This is why I like to post new recipes that I (and possibly others) have never tried before. Recipes that challenge people's perceptions, parameters, & palates. :) It's not just an opportunity to try something new. It goes beyond that. It's an opportunity to learn, to shatter preconceived notions, to enjoy expanded concepts of oneself & the world around them.
If it isn't already obvious by now, I rarely choose the easiest or the safest path. As the expression goes, with the greatest risks also come the greatest rewards. Plus, there has to be a challenge in it somewhere or I'll quickly lose interest. :) Also, there has to be a newness or sense of discovery in it as well: To be honest, I'd become bored rather quickly if I limited myself to making only one type of cuisine (i.e., standard American fare) or dish; this has to be fun for me too. :) I want to make new dishes that I've never made or tasted before, from all over the globe, & also create completely new & original combinations & culinary concepts that no one has ever thought of doing before.
I find that the longer I cook, the more adventurous I become. :)

Interestingly enough, one of the side effects of being adventurous over a prolonged period of time is that I now have an expanded definition of what "comfort food" actually is. :-D I've become comfortable making & eating a lot more types of dishes these days, and therefore realize that my definition of "comfort food" is probably a lot different from what others might find comforting. But I'm more than OK with that. :) To each their own. What might be old hat to me might be new to someone else, and vice versa.
So, I will gladly sprinkle this blog with a few comforting, classic dishes if it means that I can present some new ideas here too. :) To me, cooking for pleasure doesn't necessarily mean playing it safe. A lot of time I cook for the sheer adventure of it. I'm a culinary explorer, & so those of you who aren't accustomed to this might want to hang on tight. :)
Even so, most times, I try to make a point of posting recipes that are accessible to a large cross-section of individuals. Recipes that I think will appeal to a larger audience. That way, I figure that the ones who are less familiar with certain culinary combinations will hopefully overlook my occasional forays into the unknown. :) When I go off the map from time to time, you can bet that there'll usually be a "safe & comforting" recipe or two not far behind it. :)
This way, amidst the adventure & the unexpected, there'll also be enough recipes that are easy for people to wrap their heads -- and mouths (!) -- around. A little something for everybody. A little bit of this, a little bit of that. :)
Friday, July 30, 2010
0 Recipe #155: Balsamic Strawberries Drizzled with Sweet Ricotta Cream

1/3 c. water
2 Tbsp. honey
12-14 large strawberries, washed, hulled, & sliced 1/4" thick
dash of salt
dash of cracked black pepper
1 Tbsp. honey
Combine ricotta, 1 Tbsp. honey, & 1 tsp. lemon juice in a blender & blend at the highest speed until smooth & frothy. Mixture should be thinned out to a liquid-like consistency. Divide strawberries into even portions and transfer to bowls. Season with a sprinkling each of salt & pepper. Drizzle strawberries with balsamic syrup followed by the sweet ricotta cream. Serve immediately.
Chef's Notes: Alternatively, this dish would taste good served with low-fat vanilla ice cream as a substitute for the sweet ricotta cream.
0 Recipe #154: Couscous with Fresh Rosemary, Feta, & Vine-Ripened Tomatoes
Boy, was I hungry for lunch today! I looked around in the fridge & the cupboards to see what I had -- a little bit of this & a little bit of that, all waiting to be used up. The perishables were staring back at me with an urgency about them, saying "please cook me while I'm still fresh!" :)
When it comes to perishables, (as mentioned in a previous post), Erik & I typically tend to buy only what can be cooked & consumed in that particular week. That way, there's no kitchen waste and the food is at its freshest.
There was just a tiny bit of leftover fresh rosemary, one tomato, and some feta, so here's what I did with it all. :)

Couscous with Fresh Rosemary, Feta, & Vine-Ripened Tomatoes
This dish can be served as a meal or as a side dish. It's up to you!
Ingredients:
1 tsp. extra virgin olive oil
1/4 c. red or yellow onion, diced (about 1/4 small onion)
1 c. water
1/2 Tbsp. fresh rosemary leaves, finely minced
1 tsp. fresh Italian flat leaf parsley, finely minced
1/2 c. couscous
1/2 tsp. unsalted butter
1/2 c. feta
1/2 c. vine-ripened tomato, diced into 3/4" cubes (about 1/2 large tomato)
1 tsp. dried oregano leaves
1 tsp. paprika
Directions: Sauté onion in olive oil on low heat until translucent, about 5 minutes. Add water, rosemary (the rosemary will burn if it's cooked with the onion), & parsley, & bring to a boil. Add couscous, & quickly remove from heat. Add butter, feta, & tomatoes, & season with oregano, paprika, salt, & pepper. Stir well to combine. Cover, and let stand for 5 minutes, or until all moisture has been absorbed by the couscous. Squeeze lemon juice on top, fluff couscous, & garnish with (toasted) pine nuts. Serve immediately.
Yield: Serves 1 as an entrée or 2-3 as a side dish.
Chef's Notes: If you prefer, you can add the parsley in the final stages instead of cooking it.
Thursday, July 29, 2010
0 Recipe #153: Balsamic Chicken with Caramelized Onions
This was tonight's dinner..... I'm kinda tired after all of today's cooking & writing, so there'll be no exposition tonight. Just the recipe. :) Enjoy!
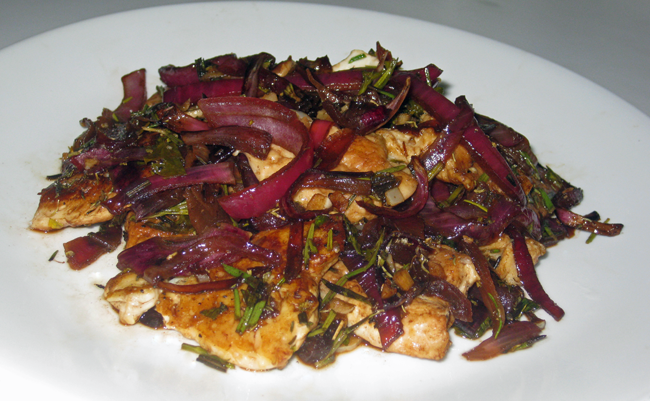
Balsamic Chicken with Caramelized Onions
1/2 c. balsamic vinegar
1 Tbsp. garlic (about 2 large cloves)
1 Tbsp. fresh rosemary leaves, finely minced (about 2 sprigs)
1/2 tsp. dried thyme leaves
Directions: Wash chicken cutlets and lay them onto a non-porous (i.e., silicone) cutting board or other smooth, clean surface. Cover chicken with plastic wrap, and tenderize by pounding flat with the bumpy (i.e., waffle-patterned) side of meat mallet to a uniform thickness of about 1/4". After chicken has been tenderized, cut each piece crosswise into halves (or thirds, if you prefer). Place cutlets into a Ziploc/resealable plastic bag, followed by 1/4 c. balsamic vinegar, garlic, & all (fresh & dried) spices. Seal bag & rub/massage spices into chicken from the outside of the bag. Marinate overnight (or for at least 4-6 hours) in the refrigerator.
Remove marinated chicken from the refrigerator, & transfer contents of Ziploc bag into the sauté pan. Cook chicken for about 3 minutes on each side, or until golden brown. Be sure to scrape off the fond (i.e., the brown, caramelized residue) from the bottom of the pan & place it on top of the chicken & onions. Remove from heat, place onto plates, & serve immediately.
0 Recipe #152: Potatoes & Butternut Squash Au Gratin

What can I say, I've been in a cheese mood lately. :) This type of hearty, piping hot dish is probably best suited for fall & winter, but since the other, remaining half of a butternut squash had been staring back at me in my fridge for about a week now already, sometimes a chef's gotta do what a chef's gotta do to avoid kitchen waste. :)
And thankfully, this recipe popped out of my head just in time, almost as if by magic. Necessity is indeed the "mother of invention." :)
While this dish might be suited to a colder clime &/or season, its ingredients are seasonless: Even though butternut squash is classified as a "winter squash," thankfully, it's available all year round, with its peak season being fall through winter.
This recipe has been tweaked a bit from its original concept: I originally tried making this dish with celeriac, in addition to the other ingredients, but after tasting it, decided it would be better without it. Celeriac can often be bitter, even after it's been cooked, & it takes an awful lot of fussing & messing around with it to lessen its bitter taste. And honestly, if it requires that much extra doctoring to make it work in a casserole, then that's probably a sign that it shouldn't probably be in there in the first place. ;) Celeriac tastes great when it's been marinated, but of course a gratin is not something that should be marinated. :) Guess I just wasn't in the mood to soak the celeriac in lemon juice for 5 years before baking it. ;) The addition of celeriac was a nice idea in theory, but the texture & flavor of the squash & the potatoes are a perfect complement to each other (& to the other existing ingredients in this dish) in & of themselves. I've learned the hard way that it pays to follow your gut instincts in the kitchen. When you inner chef says it's time to stop adding ingredients, it's best to listen. :)
Potatoes and butternut squash, ahhhhhhh, what a tasty combination. And, on that note, I give you....

Potatoes & Butternut Squash Au Gratin
4 1/2 c. butternut squash, peeled, with seeds & strings scooped out of inner cavity, & thinly sliced into 1/8" thick rounds (about 1 medium-sized squash)
4 1/2 c. red-skinned potatoes, peeled & thinkly sliced into 1/8" thick rounds (about 2-3 medium-sized potatoes)
1 Tbsp. extra virgin olive oil
1 c. whole leek, sliced into 1/4" thick rounds (about 1 small leek)
1/2 c. celery (about 1 medium-sized stalk)
3 Tbsp. shallot, finely minced (about 2 large shallots)
1 large bay leaf
1 Tbsp. fresh sage, julienned
1/2 c. (dry) sherry
1 1/2 c. light plain soy milk
Sauce Ingredients, Part 2:
1/2 Tbsp. unsalted butter
1/2 Tbsp. unbleached, all-purpose flour
1/2 c. skim milk
2 c. reduced-fat Cheddar cheese, shredded
1 c. part-skim, nonfat ricotta cheese
Directions: With a spray bottle or Misto oil diffuser, spray a 9 x 13" rectangular Pyrex glass casserole dish with olive oil. (Or just use a pastry brush if you prefer.) Set aside.
Next, bring 10-12 c. of lightly salted water to a boil in a large stock pot. Then add sliced potatoes & butternut squash & boil (on high heat) for about 15 minutes, or until almost tender. IMPORTANT: When ready, the vegetables should still be somewhat firm & slightly undercooked; since you'll be baking them later, you don't want them to be completely cooked all the way through at this point.
While vegetables are boiling, sauté leek & celery in olive oil on low heat in a large, deep, nonstick sauté pan until almost tender, about 3 minutes. Then add shallots & bay leaf & cook for another 2 minutes. Do not allow ingredients to brown or burn. Add sage & then deglaze with sherry, continuing to cook for another 5-7 minutes or so, or until liquid has been reduced to only a thin layer on the bottom of the pan. Remove from heat & let cool. Remove & discard bay leaf & then transfer mixture to a blender. Add soy milk, & pulse until smooth. Set aside.
Next, make the roux & cheese sauce: In a medium-sized nonstick sauce pot, melt butter on low heat & then immediately whisk in flour, followed in rapid succession by the milk, cheddar & ricotta cheeses, salt, pepper, marjoram, & ground mustard. Transfer leek-shallot-celery mixture from blender to the sauce pot & continue to stir until well-combined. Remove from heat & set aside.
When vegetables have finished cooking, drain in a colander, run under cold tap water to cool, & then drain once more, gently shaking off excess water. When vegetables have adequately cooled, start assembling gratin/casserole, taking particular care in handling the squash, which can be brittle after cooked: Layer slices of potatoes & squash in an overlapping (i.e., "scalloped") fashion. (I like to make striped rows of each vegetable type, but you can do whatever patterns you like.) After each full vegetable layer has been completed, pour a thin layer of the cheese-leek mixture over each layer of sliced vegetables, followed by an evenly distributed sprinkling of Asiago (or Parmesan) & thyme leaves. After the final layer has been completed & topped with sauce, Asiago, & thyme, sprinkle a fine layer of bread crumbs across the top face of the casserole. Cover casserole dish with aluminium foil (shiny side facing downward), & bake for about 30-35 minutes on 375°F. From a safe distance, open oven, slide out rack holding casserole dish (using silicone mitts or grippers), & carefully peel back foil using heat-proof tongs, watching for escaping steam. Slide rack back into the oven, and cook casserole, uncovered, for 25-30 more minutes, or until vegetables have become tender & the casserole's top has turned golden-brown. (It should also be bubbly. Do not overcook, or casserole will be dry & brittle.) About 10-15 minutes into cooking, test casserole with a knife or fork; if the tip of the knife/fork goes in with little resistance, it's done. Let cool slightly before serving.
Yield: Makes approximately 12 square portions, about 3 square inches per person.
Chef's Notes: Potatoes discolor/oxidize soon after their flesh is exposed to air. Therefore, it's important that the slicing & boiling steps be particularly well-coordinated with one another. If you chop all the vegetables at the same time you're waiting for the water to boil, everything should be timed just perfectly. I'd also recommend that you peel & slice the vegetables according to their oxidation rates: In other words, prepare/slice the butternut squash first, followed by the potatoes. (Whatever oxidizes first is what's going to be peeled & chopped last.) If necessary, you can soak the potatoes in acidulated water (i.e., water with a few tablespoons of fresh lemon juice or distilled white vinegar).
This dish would also taste good with mushrooms &/or cauliflower.
Wednesday, July 28, 2010
1 Recipe #151: Gourmet Macaroni & Cheese
What could be more quintessentially American -- or should I say, quintessential to the American childhood experience -- than "Mac (Macaroni) & Cheese"?!
To be honest, I never thought I'd be adding a macaroni & cheese recipe to this blog, especially after what I wrote in this post, but then again, stranger things have happened. ;) However, I'm hardly going against my earlier stated motto, (i.e., "Life is short, so why only eat hamburgers or mac & cheese?" ;) ). Frankly, previous to last night's recipe testing, I don't even remember the last time I actually ate macaroni & cheese. That's because it's usually made (by others) in incredibly fattening ways, so I tend to avoid it if it's served at a party or buffet. :) However, I'm offering you a healthy homemade alternative that satisfies the taste buds as well, so sure, why not indulge in a guilt-free fashion once in a while. :) And, true to form, this "ain't no ordinary mac 'n' cheese recipe." :) It's a little bit less traditional than your typical macaroni & cheese recipe, made a little bit more sophisticated for us adults. ;)
The good news is that this recipe has far less butter than most existing recipes out there, just a hint for flavor -- and there's absolutely NO cream or flabby, rubbery-tasting slices of processed American cheese, etc. -- so it's a LOT healthier, (not to mention MUCH better-tasting!), than most versions that rely heavily on these ingredients.
It still tastes incredibly rich & creamy. I know, hard to believe, but I swear, it's true. :) Also, the sauce has a surprisingly thick consistency. A lot of "health food" recipes I've seen out there seem to rely on ingredients like cottage cheese or use all skim milk -- The first seems like it'd make the sauce too lumpy while the latter by itself probably isn't going to make the sauce thick enough. The secret to this recipe's sauce is the addition of a bit of flour, which acts as a very effective thickening agent. There's also a pinch of mustard in there too. Sounds strange, I know, but it really does enhance the flavor considerably.
I was really pleased with how this recipe turned out. Hope you will be too!

Gourmet Macaroni & Cheese
Pasta Ingredients:
1 c. dry, uncooked Barilla Plus elbow macaroni pasta
4 c. lightly salted water
drop of olive oil (to keep pasta from sticking together & to sides of pot)
Topping Ingredients:
1/2 tsp. unsalted butter
1/2 Tbsp. freshly grated/shredded Asiago cheese (or Parmigiano-Reggiano, if you prefer)
1 Tbsp. plain bread crumbs (use panko, Japanese bread crumbs, or make yourself from leftover, stale bread)
Sauce Ingredients:
1/2 Tbsp. unsalted butter
1/2 Tbsp. unbleached, all-purpose flour
1/2 c. skim milk
1/4 c. light nondairy creamer
3/4 c. reduced-fat cheddar cheese, shredded
1/2 tsp. fresh thyme leaves
1/4 tsp. dried oregano leaves
1/8 tsp. dried, ground (yellow) mustard
1/8 tsp. salt
1/8 tsp. ground black pepper
Directions: Bring lightly salted water to a rolling boil in a medium-sized pot. Add pasta & cook until al dente, about 9-11 minutes. While pasta is cooking, make the topping: Melt butter in a nonstick sauté pan on medium heat. Add Asiago & let it melt for about 30-60 seconds. Turn up heat to medium-high & then add bread crumbs & brown, about 5-7 minutes. Remove from heat & set aside. Drain pasta well & set aside. Next, make sauce: In the same pot used to boil the pasta, melt butter & rapidly whisk in flour, until the mixture forms a light roux. Then immediately turn down heat to medium-low. Keep whisking at a brisk pace, adding milk & creamer, & then cheddar. Whisk until melted & then remove from heat. Stir in all dry spices/herbs, add in pasta & gently stir to combine. Then transfer pasta mixture to a small, heat proof casserole dish, using a heat-proof spatula to scoop out the rest of the cheese sauce from the pot. Top with bread crumbs & bake for 25-30 minutes on 375°F, or until topping has adequately browned. (Optional: Season with a dash of paprika & garnish with a sprig of parsley or some chives.) Serve & enjoy!
Yield: Serves 2 as a main course, or 3, if you plan to serve it with a salad or vegetable side. Serves 4-5 as a side dish, depending upon how hungry you are. :)
 Variations: When I first made this recipe in my test kitchen, I didn't have any elbow macaroni in my pantry at the time, so I substituted farfalle (bowtie pasta) for some added interest. You could also use shells (conchiglie), or any other type of pasta you choose: Other fun suggestions include catavappi, fiori, gemelli, orecchiette, rotini, rotelle, etc. (For a fairly comprehensive guide to various pasta shape options, check out this link.)
Please note that if you use other pasta shapes, you might need to adjust the amount of cheese sauce you make. I found that when I used farfalle I didn't need to make as much cheese sauce as when I made the dish with elbow macaroni. The elbow macaroni might be smaller, but after it's cooked, it has more total surface area. :)
Other ideas include using multicolored pasta or adding vegetables for nutritional value: halved cherry or grape tomatoes, broccoli, cauliflower, mushrooms, olives, red bell pepper, zucchini, asparagus, butternut squash, etc. (Just toss in the vegetables when you're baking the macaroni in the oven.) If you use the butternut squash, you might be able to get away with skipping the step of making the roux, since butternut squash is extremely creamy in its own right.
You could also try some additional spices like marjoram, fresh sage, &/or fresh rosemary. Or, bring on the heat with some red pepper flakes, ground cayenne pepper, or jalapeños. You could also try substituting low-fat buttermilk, part-skim nonfat ricotta, &/or nonfat Greek yoghurt for either some or all of the creamer &/or milk. Alternatively, try using a different kind of lowfat cheese like Monterey (Pepper) Jack, mozarella, feta cheese, etc. Or, for a vegan version, try substituting low-fat soy milk or tofu for the roux, milk, & creamer, & soy cheese for the cheddar.
Of course, I've given you the basic template (above), so feel free to experiment & do your own thing. Variations on a theme are always fun to do. :)
Friday, July 23, 2010
2 Another Milestone Reached: A Blog Contest to Celebrate 150 Recipes in 3 Years!

Thursday, July 22, 2010
0 Recipe #150: Tequila-Lime Chicken Fajitas
 |
| Tangy and flavorful, this version of chicken fajitas is one that you won't forget anytime soon. :) |
Several months ago, we'd brought back two different bottles of tequila from Mexico to give away as gifts for friends, as tokens of our trip. We gave one bottle to a friend of ours as a thank you for taking care of our cats while we were gone. :) Well, many months have since passed & for some reason, the other unopened bottle still remains in our possession. Plus, I'd forgotten about the bottle of José Cuervo I'd bought for the aforementioned house parties of several years past. So that makes two bottles of tequila I need to use up. :)
Hence, the reason for me creating this tequila-lime chicken fajitas recipe. :)
Now, I just gotta think of another creative use for the rest of the tequila. Hmmmm, maybe a margarita recipe? I'm more inclined to cook with it, so perhaps I'll use it in another kind of marinade or sauce for steak or seafood. Not sure yet. We shall see.....
Anyhow, hope you enjoy this recipe. It was tonight's dinner chez Cyberpenguin. :)

Tequila-Lime Chicken Fajitas
Marinade Ingredients:
1 lb. thinly sliced, boneless, skinless, chicken breasts, washed, and defatted
1 tsp. garlic powder
1/2 Tbsp. mild Mexican chili powder
2 Tbsp. paprika
1/2 Tbsp. dried oregano leaves
1/4 tsp. salt
1 tsp. lime zest (from 1 large lime)
3 Tbsp. freshly squeezed lime juice (from 1 large lime)
1/4 c. gold tequila
Other Fajita Ingredients:
1 Tbsp. extra virgin olive oil
1 c. yellow onion, peeled, halved, and then cut into 1/2" thick crescent slivers (about 1/2 medium-sized onion)
1 c. red bell pepper, seeded & sliced into long, 1/2" thick strips (about 1/2 large pepper)
1 c. green bell pepper, seeded & sliced into long, 1/2" thick strips (about 1/2 large pepper)
1/4 c. gold tequila
4-6 medium-sized, soft flour tortillas
Accompaniments:
pico de gallo (or salsa)
4-6 Tbsp. Monterey Jack cheese, shredded
4-6 Tbsp. Greek yoghurt, about 1 Tbsp. per fajita
a few avocado slices or guacamole
2 Tbsp. fresh cilantro, finely minced (for garnish)
Directions: Place chicken on an even, non-porous surface, cut on the bias into 1" x 3” thick strips, and transfer to a re-sealable plastic bag. Next, add remaining marinade ingredients to the bag, seal, and refrigerate overnight or for at least 6-8 hours. Sauté onions in extra virgin olive oil on medium heat in a large sauté pan until translucent, about 3 minutes. Then add green and red bell peppers and cook for about 3 more minutes, or until onions turn golden brown & the peppers become tender. Deglaze with remaining 1/4 c. tequila and cook for another 3-4 minutes or so, until liquid reduces to a thin layer on the bottom of the pan. Remove from heat, transfer to a medium-sized bowl, and set aside. Heat pan. Sauté chicken in the residual olive oil and marinade juices for about 3 minutes per side, or until tender and the meat is no longer pink on the inside. (Chicken will cook very quickly, as the pan should be very hot at this point. So make sure you watch the chicken very carefully!) Transfer to a separate bowl and set aside. Next, assemble fajitas: Divide the chicken into equal portions. Place a small amount of chicken onto each tortilla, then add onions and peppers, and any toppings you’d like -- pico de gallo, shredded cheese, a dollop of nonfat Greek yoghurt, avocado slices (or guacamole), fresh cilantro, etc. Serve and enjoy!
Serving Suggestions: This dish is sometimes served with refried beans and Mexican rice, although I've found the fajitas by themselves to be more than enough food for a single meal.
0 Recipe #149: Pico de Gallo
Here's another recipe for a condiment that I'll be serving along with tonight's dinner, "Tequila Lime Chicken Fajitas." Some people think of pico de gallo as salsa; however, its simplest form, I'd say that it more closely resembles a side salad of marinated fresh raw chopped vegetables than an actual sauce/salsa per se.
It's commonly used as a topping for tacos, empanadas, tortilla chips, and of course, fajitas. :)

Pico de Gallo
Ingredients:
1 1/2 c. vine-ripened tomatoes, diced (about 1 1/2 large tomatoes)
2 Tbsp. freshly squeezed lime juice (the juice about about 1/2 lime)
1/4 c. red onion, peeled & diced (about 1/4 large onion)
1/2 Tbsp. jalapeño, stemmed & diced (or seeded & reduced to 1/4 tsp., if you prefer less heat)
1/2 Tbsp. fresh garlic, peeled & finely minced (about 1 small clove)
1/4 tsp. salt
1/8 tsp. ground black pepper
2 Tbsp. fresh cilantro, finely minced
1/2 tsp. pico de gallo seasoning (substitute with Mexican chili powder if unavailable)
1/4 tsp. ground cumin
1 dash hot sauce, or to taste (optional)
Directions: Mix together ingredients, marinate in refrigerator for 1-2 hours, & then serve.
Yield: Makes a little more than 2 c. (Or, 2 c. + 1 T. + 1 1/8 tsp., to be exact. ;) )
Chef's Notes: Some of you may prefer to drain (or seed) the tomatoes before incorporating them into the pico de gallo mixture. Or, alternatively, you could use quartered grape or cherry tomatoes, which contain less juice than the full-sized, vine-ripened variety.
2 Recipe #148: Mexican Chili Powder Mix
This afternoon, I'm giving you another spice mix recipe, this time for Mexican chili powder, which can be used for tonight's upcoming recipe, Tequila Lime Chicken Fajitas. Again, it's something really easy that can be made in 5 seconds flat. So, if you're out of Mexican chili powder seasoning & don't feel like making a trip to the grocery store, here's a recipe for whipping up your own batch from spices already in your kitchen cabinets.
I made this recipe very mild on purpose to satisfy the typical American palate (save the Southwestern region of the United States!), although it can be made spicier for those who can hack it. :) Personally, I like mine with a lot more heat. You'd think I'd been raised in the Southwestern U.S., Southeast Asia, China, or the Indian Subcontinent, or something. ;) But alas, no. Almost no one else in my immediate family likes hot & spicy foods, so maybe the stork delivered the wrong baby to the hospital. Haha! Just kidding.
Mexican Chili Powder Mix
 Ingredients:
4 Tbsp. ground cumin
3 Tbsp. paprika (Use a very mild variety!)
¼ tsp. ground cayenne pepper
¼ tsp. red chili pepper flakes (1 crushed chile de arbol)
1 Tbsp. dried oregano
2 tsp. garlic powder
2 tsp. salt
Directions: Blend together in a small bowl & transfer to an airtight, glass container. (Glass keeps spices better than plastic & won't react with the spices like plastic does.) Store in a dark, cool place.
Yield: Makes Almost 9 Tbsp. (8 Tbsp. + 2 1/2 tsp.), or a little more than 1/2 c.
Chef's Notes: You can place red chili pepper flakes in a spice grinder or food processor if you like your Mexican chili powder seasoning to be more finely ground.
Variations: For more heat, add more red chili pepper flakes &/or chile de arbol, to taste. You can also try other dried chili peppers like ancho, guajillo, cascabel, or chipotle, either in combination or separately. Another idea, albeit a nontraditional one, would be to add epazote, to taste.
Wednesday, July 21, 2010
0 Recipe #147: Fettuccine with Butternut Squash & Feta in a Hazelnut-Sage Butter Sauce
Butternut squash & sage just go together. Combine these ingredients with hazelnuts, a little bit of butter, feta, & some pasta, & you've got something yummy. :)

Fettuccine with Butternut Squash & Feta in a Hazelnut-Sage Butter Sauce
Ingredients:
2 servings fettuccine
3-4 c. lightly salted water, seasoned with a drop of extra virgin olive oil (to keep pasta from sticking together)
1 Tbsp. extra virgin olive oil
1 Tbsp. unsalted butter
1/2 c. shallots, finely minced (about 2 large shallots)
2 c. butternut squash, peeled & diced into 1" cubes (about 1 small squash)
2 Tbsp. hazelnuts, chopped
2 tsp. fresh Italian flat leaf parsley leaves, roughly chopped (for garnish)
Directions: In a large sauté pan, heat olive oil & melt butter. Then add shallots & butternut squash & sauté over low heat until tender, about 8-10 minutes. Stir occasionally; do not let shallots & butternut squash brown too much or burn. Also, it's very important to avoid crowding the pan: Be sure to spread out ingredients evenly across pan, so that they cook uniformly. Add hazelnuts & sage, & cook for another 2-3 minutes, or until sage has become slightly crisped/shriveled. Season with salt & pepper, add thyme & then water (to deglaze). Also add creamer at this point, if using. Cook for 10-15 more minutes, until liquid has reduced to a thin layer on the bottom of the pan. Stir occasionally to keep ingredients from sticking or burning.
While sauce is cooking, make pasta: Bring medium-sized pot of lightly salted water to a boil and cook pasta until al dente, about 9-11 minutes. Remove from heat & drain. Transfer to colander, shock with cold water, & drain again. Divide pasta into 2 equal portions, transfer to bowls, & set aside.
When sauce has finished, remove from heat. Add lemon juice & nutmeg, & then quickly stir in feta cheese to melt it slightly & make the sauce creamier. Pour sauce onto pasta. Garnish with parsley & serve immediately. Time to dig in! :)
Yield: Serves 2.
Chef's Notes: To prepare butternut squash, cut in half and scoop out the seeds & strings in the center cavity. Flip the squash halves upside down and peel them. You might want to wear gloves while doing this, as the raw squash rind can apparently irritate your hands. Mine didn't itch or tingle while peeling or cutting the squash, but of course, that's just me. :)
Variations: If you prefer, you can substitute goat cheese or freshly shredded or shaved Parmegiano-Reggiano cheese for the feta.
0 Recipe #146: Pineapple-Melon Sorbet
This sorbet is tart & sweet, & very refreshing! It's also incredibly easy to make.

Pineapple-Melon Sorbet
Serve between courses to cleanse the palate or as a dessert.
Ingredients:
2 c. honey dew melon, cut up into 2" square chunks
5 large fresh mint leaves
2 Tbsp. lime juice
2 egg whites
1 Tbsp. honey
1/2 c. pineapple juice
Directions: Place all ingredients into a blender & pulse until smooth. Pour into an ice cube tray & freeze for 2-3 hours. When frozen solid, remove from freezer & place back into the blender. Pulse only until cubes have broken up into an icy but still thick, frothy concoction. Do not overpulse or mixture will turn to liquid. Garnish with a mint sprig or a lemon/lime slice. Serve immediately.
Yield: Serves 2-4.
Variation: Spike with a splash of Midori melon liqueur. :)
Tuesday, July 20, 2010
0 Recipe #145: Restaurant-Style, Hot & Spicy, Sweet & Sour Chicken
Woo-hooooo! I'm incredibly pleased with how this recipe turned out! When I was sampling it during the cooking process, I could tell that it was going to be good. The sauce was really flavorful, the breaded chicken was light & crispy, & the vegetables were tender but still firm & crunchy. It was just one of those evenings where everything seemed to perfectly fall into place during the cooking process.
Erik gave this dish a huge & very enthusiastic thumbs up. In fact, the general household consensus is that this dish is one of the best chicken dishes I've ever created. :) It really tastes authentic, like it came right out of a Chinese restaurant -- I kid you not!
Hope you enjoy this recipe as much as we did tonight!

Restaurant-Style, Hot & Spicy, Sweet & Sour Chicken
Sauce Ingredients:
1 Tbsp. extra virgin olive oil
1/2 c. shallot, finely minced (about 2 large shallots)
1 c. yellow onion, diced (about 1/2 large onion)
1/2 c. baby carrots, sliced crosswise into 1/2" rounds (about 6 baby carrots)
1 Tbsp. fresh ginger, peeled & diced (about 1" piece)
2 1/2 c. rhubarb, sliced crosswise into 1/2" pieces (about 5 stalks)
1/2 tsp. salt
1/4 tsp. ground white pepper
1/2 tsp. red chili pepper flakes
1/2 c. sweet vermouth
2 Tbsp. red wine vinegar
2 Tbsp. honey
1 Tbsp.freshly squeezed lime juice
2 c. pineapple juice
1 c. water
Breaded Chicken Ingredients:
2 eggs
1 lb. chicken, washed, defatted, & tenderized with a meat mallet
1 c. corn starch
6 Tbsp. (3/8 c.) sesame seed oil
Stir Fry Ingredients:
2 c. red bell peppers, seeded & diced into 1/2" squares (about 1 1/2 pepper)
2 c. green bell pepper, seeded & diced into 1/1" squares (about 1 1/2 pepper)
2 c. pineapple, diced into 1/2" cubes
2 tsp. salt
Directions: Sauté shallots, onions, & carrots in olive oil in a medium-sized sauce pot on low heat until translucent, about 5 minutes. Add ginger & rhubarb, season with (1/2 tsp.) salt, ground white pepper, & red chili pepper flakes, & then immediately deglaze with vermouth. Add vinegar, honey, lime juice, pineapple juice, & water, turn up heat to medium, & cook for about 10 minutes or until vegetables have become tender & the liquid contents have been reduced by about half their volume. Stir occasionally to keep sauce from sticking to the bottom of the pan.
While sauce is cooking, prepare chicken: Wash & defat chicken, removing tendons, & place on a clean, non-porous surface. Cover with plastic wrap & tenderize, pounding with the bumpy, textured end of a meat mallet until 1/8" thick. Cut chicken into approximately 2 square inch pieces & set aside. Crack eggs into a bowl & beat together using a fork or whisk. Dip chicken into egg mixture, coating both sides & place pieces into a plastic Ziploc bag filled with corn starch. Seal bag & shake to coat chicken. Remove chicken pieces from bag, shaking off excess corn starch, & place in a bowl or a large plate.
When ready, remove sauce from heat & let cool. Transfer to a blender & pulse sauce until smooth. Set aside.
Next, heat sesame seed oil in a large sauté pan on medium-high heat. Place chicken into the pan & cook until breaded exterior turns golden brown on both sides. (You might need to cook the chicken in two separate batches, using 3 Tbsp. sesame oil for each batch.) Add red & green peppers & pineapple chunks, season with (2 tsp.) salt, & cook for another 30-45 seconds (to slightly soften peppers) before adding sauce. (Do not let fruit & vegetables brown.) Pour in just enough sauce so that it just covers the chicken. Fold sauce into chicken & vegetables to cover them completely. Cook for just a few more minutes, until vegetables are tender but still crunchy. Stir occasionally. Do not let chicken linger in the sauce for too long or it will become soggy. Remove from heat. Divide into equal portions, & serve immediately.
Serving Suggestions: This dish tastes particularly good topped with soy sauce &/or sesame seeds.
Yield: Serves 4-6.
0 Recipe #144: Mint & Kalamata Olive Pesto
Below is my own little spin on pesto. Enjoy!

Mint & Kalamata Olive Pesto
Ingredients:
1/4 c. extra virgin olive oil
1 tsp. garlic, peeled & roughly chopped (about 1 medium-sized clove)
2 Tbsp. pignoli (pine) nuts, lightly toasted (takes about 1-2 min. in toaster on "top brown" setting)
1 c. fresh mint leaves, destemmed and densely packed
1 Tbsp. fresh Italian flat leaf parsley, roughly chopped & densely packed
1/4 c. Kalamata olives, pitted
1 Tbsp. freshly squeezed lemon juice
1/4 c. Asiago cheese, freshly shredded (For best results, shred block of Asiago using a microplane grater.)
1/8 tsp. salt (or to taste; or, can omit altogether, since Kalamata olives already provide a salty flavor)
1/8 tsp. ground black pepper
Directions: Place olive oil, garlic, & toasted pignoli nuts in a food processor, and pulse until the mixture is finely ground. Next, add basil, parsley, & olives, incorporating a small batch at a time (via the feed tube) while pulsing the mixture until it becomes thick and smooth. Stir in the lemon juice, shredded cheese, salt (if using), & pepper, & blend until desired consistency is obtained. Serve atop pasta & garnish with additional shredded Asiago, or use as a topping for chicken, fish, etc.
Yield: 4-6 servings.
Variations: Instead of Kalamata olives, try using Greek or cracked green olives.
Chef's Notes: Pesto will keep in the refrigerator for about 1-2 weeks. IMPORTANT: If you plan to freeze the pesto, it's best to leave out the cheese and add it after you thaw out the pesto. Cheese doesn't freeze very well.
Monday, July 19, 2010
0 Recipe #143: Celeriac Remoulade (Céleri Rémoulade / Rémoulade de Céleri-rave)
When I lived in France, I had the most marvelous marinated salad, which was composed mostly of celeriac, or celery root as it is sometimes known. It'd usually be served cold (or at room temperature) as a frequent accompaniment to a main course, & often seemed to be everywhere I looked. :)
I didn't think to ask what it was called at the time, and it wasn't until much later that I found out what it was called - celeriac rémoulade -- la rémoulade de céleri-rave or le céleri rémoulade in French. As it turns out, it's considered a French classic, & was first popularized in Provence in the early 1930's. It's kind of like the French version of coleslaw, except it's usually savory instead of sweet. ;)
There are many variations of celeriac remoulade: Depending on regional customs & personal taste, it can also be made with apples &/or even nuts. Celeriac remoulade is traditionally paired with shredded carrots marinated in a light vinaigrette. In the French collective consciousness, this is what is expressly envisioned when one thinks of crudités.
Needless to say, I am a huge fan of this dish. And the really cool thing is that the below recipe tastes exactly as I remember it. Eating it transports me right back to France. :)
For those of you who are unfamiliar with celeriac, here's a photo of what it looks like in its whole form and some information about it:

Number of Calories in Celeriac
As you can see in the above photo, celeriac, like many other root vegetables, has a gnarled, bumpy texture. While its exterior might not be a pretty sight to look at, like many things, its true beauty lies on the inside. :)

Celeriac Remoulade
Crunchy, light, & refreshing, this is the perfect side dish for summer!
Ingredients:
1 egg yolk
3/4 tsp. kosher salt (or finely milled sea salt)
1/2 tsp. ground black pepper
1 Tbsp. Dijon mustard (or coarse, whole grain mustard)
3 Tbsp. freshly squeezed lemon juice
1 Tbsp. distilled white vinegar
1/2 c. canola (or vegetable) oil
1/2 c. nonfat plain Greek yoghurt
1/2 tsp. fresh tarragon leaves, finely minced
1/2 tsp. fresh chervil leaves, finely minced
3 c. celeriac (about 1 medium-sized bulb)
Directions: Using a whisk, beat egg, salt, pepper, & mustard in a deep, medium-sized mixing bowl until well combined. Add vinegar & 1 Tbsp. lemon juice & briskly whisk together, slowly incorporating oil until the mixture emulsifies and begins to thicken. Refrigerate for 2 hours to allow mixture to thicken even more. Remove from fridge & add Greek yoghurt & remaining 2 Tbsp. lemon juice. Whisk again, rapidly, until well combined. Add fresh tarragon & chervil & gently mix together. Place mixture back into the fridge while you prepare the celeriac.
Peel & julienne celeriac into 1/8" x 2" matchsticks/strips (by hand or using a food processor). Quickly remove sauce from the fridge. Immediately transfer celeriac to the mixing bowl where the remoulade/sauce is contained, & thoroughly toss to coat all of the celeriac (to prevent discoloration). Cover with saran wrap & refrigerate for at least 3 hours before serving. (The longer you marinate it, the better it will taste!) Serve cold or at room temperature. Will keep up to 2-3 days in the fridge.
Yield: Serves 4-6.
Variations: Other possible additions include 1 tsp. fresh, finely minced Italian flat leaf parsley, 1/2 tsp. fresh thyme leaves, &/or 1/2 Tbsp. fresh, chopped chives. Go easy with the fresh spices, especially the parsley & thyme -- they pack quite a powerful punch. Add a little bit & then taste test first before adding more. You can always add more later. :)
Also, for a bit more zing, you could try 1/2 Tbsp. capers &/or 1 Tbsp. chopped cornichons (i.e., mini, sour pickled gherkins) or sour dill pickle. (These are actually very traditional additions.)
For some creative & non-traditional ingredient ideas, try 2 Tbsp. shredded red bell pepper, 2 Tbsp. shredded carrots, &/or 1-2 Tbsp. chopped Kalamata olives.
Or, for a little bit more interest, try substituting 1 c. Granny Smith apple for 1 c. celeriac in the above recipe. Julienne into 1/8" x 2" matchsticks, & marinate it along with the celeriac. I've made it this way before, & it's rather tasty! Celeriac tends to be a tad bit bitter sometimes, so the addition of apple really helps to mellow out the flavor of this dish. The apple's flavor is actually very mild & subtle when combined with the other ingredients, so it doesn't really taste that sweet or tart at all. It adds just a hint of flavor. Both the apple & the celeriac have a crunchy texture, so they are the perfect complement for one another.
Some people also like to add garlic, but I'd strongly advise against it. I do enjoy bold flavors, but sorry to say it, the garlic just tastes wrong in this dish. First, I find it to be overpowering even in the smallest amounts. The first time I made it, I tested it with only a tiny bit of garlic & it was still way too strong, so believe me when I say that a little bit goes a LONG way! Second, there's enough flavor in the other ingredients to carry the dish by itself. Also, it's not a flavor that's really supposed to be added. Most authentic celeriac remoulade recipes are made sans ail (without garlic). A much better addition would be chives. They are far milder & complement the other flavors in this dish without overpowering them.
 Chef's Notes: In my experience, celeriac is often hard to find at conventional grocery stores here in the U.S. However, I did find it at Whole Foods, so you can either try there or look for it in European specialty markets. My mom recently told me that they also carry it at Wegman's, so that'd be another good place to look. Come to think of it, Trader Joe's might possibly carry it too.
Since celeriac discolors a bit once sliced open, it's advisable to make the sauce first for the best results. Also, don't be concerned about using a raw egg; the acidic components in the sauce (i.e., lemon juice, vinegar, etc.) "cold cook" all of the ingredients and tenderize the grated celery root to give it a nice texture.
Some people like to shred the celeriac with a food processor fitted with a metal blade that does coarse (i.e., wider) cuts. Of course, this will save a lot of time. You could also use a mandolin, although I tend to stay away from them for safety reasons. :) Personally, I prefer julienning it by hand as the food processor blades I own tend to make rather small shreds, which is not really the way this salad should be made. Think I need to get another blade for my food processor. ;)
Also, be sure to use canola (or vegetable) oil, and NOT olive oil in this recipe. Olive oil, particularly extra virgin olive oil, is a bit too sharp & overpowering for this dish. The general concept here is to allow the celeriac, mustard, & lemon juice flavors to take center stage, with the other flavors acting as background notes.
Sunday, July 18, 2010
0 Recipe #142: Spaghetti with Vine-Ripened Tomatoes & Fresh Herbs
There's nothing quite like homemade tomato sauce made from scratch with fresh seasonal ingredients. So easy to make & so delicious. This particular recipe only takes a few minutes to prepare & cook. Buon appetito!

Spaghetti with Vine-Ripened Tomatoes & Fresh Herbs
4 servings Barilla Plus spaghetti, measured with a spaghetti measure
1 Tbsp. extra virgin olive oil
2 Tbsp. shaved Asiago or grated/shredded Parmesan
Directions: In a medium-sized sauce/stock pot, bring 6-8 c. lightly salted water to a rolling boil, add spaghetti & a drop of olive oil, & cook for 9-11 minutes, to reach al dente. While pasta is cooking, sauté shallots in olive oil in another sauce pot on low heat until soft. Add all remaining ingredients (minus cheese) & cook until the sauce has thickened. The sauce cooks very quickly, so be sure not to overcook it: When the sauce is done cooking, the tomatoes & herbs should be tender but still slightly firm; also, the herbs should still be bright green. Remove sauce from heat. Drain pasta, divide into equal portions, & top with sauce & shaved Asiago or grated Parmesan. Serve immediately.
Yield: 4 servings.